Connection Plugins#
This section describes connection plugins supported by Ligato.
Connection plugins communicate with internal or external applications and components using REST and gRPC APIs.
REST Plugin#
The REST plugin can retrieve, or rather dump, VPP configuration data. You cannot use REST to add, modify, or delete configuration data.
The plugin provides a general purpose HTTP server so you can use so you can expose your plugincan be used by plugins to expose a REST API to external clients.
The REST handler tutorial illustrates how to implement a REST API for a customized plugin.
References:
- VPP Agent REST API Docs
- Ligato cn-infra REST folder
- REST plugin folder
- REST conf file
- REST handler tutorial
Configuration#
You do not require an external file to open the default HTTP server endpoint on port 0.0.0.0:9191.
However, you can configure a different port number with one of the following options:
- VPP agent flag:
-http-port=<port>`- Set the
HTTP_PORTenv variable to a desired value - Set the endpoint field in the REST conf file:
endpoint: 0.0.0.0:9191Usage#
cURL
To execute VPP agent REST APIs, specify the GET method, target HTTP IP address:port, and the path.
cURL example using GET /dump/vpp/v2/interfaces:
curl -X GET http://localhost:9191/dump/vpp/v2/interfacesYou will see that all VPP agent REST API include /dump in the path, indicating read-only support.
To see more cURL examples, see VPP Agent REST API.
Supported URL#
For a complete list of all supported VPP agent REST APIs, with examples and OpenAPI definitions, see VPP Agent REST API.
HTTP Security#
The REST plugin supports several HTTP security mechanisms.
Here’s a list of the configurable security options:
- server certificate (HTTPS)
- Basic HTTP Authentication - username & password
- client certificates
- token based authorization
All options are disabled by default. You can enable option using a conf file:
endpoint: 127.0.0.1:9292
server-cert-file: server.crt
server-key-file: server.key
client-cert-files:
  - "ca.crt"
client-basic-auth:
  - "user:pass"
  - "foo:bar"
If you define server-cert-file and server-key-file, the server requires HTTPS instead of HTTP for all of its endpoints.
client-cert-files - list of the root certificate authorities (CA) the server uses to validate client certificates. If you have at least one entry in this list, only clients who provide a valid certificate can access the server.
client-basic-auth - lets you to define user/password credentials permitting access to the server. The config option defines a static list of allowed user(s). If you have at least one entry in this list, the default staticAuthenticator is instantiated. Alternatively, you can implement an custom authenticator, and inject it into the plugin. You would use this approach if you need to read credentials from etcd.
Example
To generate self-signed certificates, use the following commands:
#generate key for "Our Certificate Authority"
openssl genrsa -out ca.key 2048

#generate certificate for CA
openssl req -new -nodes -x509 -key ca.key -out ca.crt  -subj '/CN=CA'

#generate certificate for the server assume that server will be accessed by 127.0.0.1
openssl genrsa -out server.key 2048
openssl req -new -key server.key -out server.csr -subj '/CN=127.0.0.1'
openssl x509 -req -extensions client_server_ssl -extfile openssl_ext.conf -in server.csr -CA ca.crt -CAkey ca.key -CAcreateserial -out server.crt

#generate client certificate
openssl genrsa -out client.key 2048
openssl req -new -key client.key -out client.csr -subj '/CN=client'
openssl x509 -req -in client.csr -CA ca.crt -CAkey ca.key -CAcreateserial -out client.crt -days 360
Once you enable the security features, you can access the endpoint using the following commands:
HTTPSwhereca.pemspecifies the CA where you validate server certificates, in the case of self-signed certificates.curl --cacert ca.crt https://127.0.0.1:9292/log/listHTTPS + client certwhereclient.crtdefines a valid client certificate.curl --cacert ca.crt --cert client.crt --key client.key https://127.0.0.1:9292/log/listHTTPS + basic authwhereuser:passdefines a valid username password pair.curl --cacert ca.crt -u user:pass https://127.0.0.1:9292/log/list
HTTPS + client cert + basic authcurl --cacert ca.crt --cert client.crt --key client.key -u user:pass https://127.0.0.1:9292/log/list
Token-based Authorization#
The REST plugin supports token based authorization. You can enable this feature by setting enable-token-auth parameter contained in the REST plugin conf file:
enable-token-auth: trueAuthorization restricts access to all registered permission group URLs. The user receives a token after login, which grants access to all permitted sites. The token is valid until the user logs out, or until the it expires.
You can set the token expiration time with the token-expiration parameter contained in the REST plugin config file:
token-expiration: 600000000000 Note that time is in nanoseconds. If you do not configure a time, the default of 1 hour is set.
By default, token uses a pre-defined signature string as the key to sign it. You can changes this using the token-signature parameter contained in the REST plugin conf file.
token-signature: <string>After login, the token is required in an authentication header in the format Bearer <token>, so it can be validated. If the REST interface is accessed with a browser, the token is written to a cookie file.
Users and Permission Groups#
Users must be pre-defined in the REST conf file. User definitions consists of a name, hashed password and permission groups.
User format example:
users:
   - name: <name>
     password_hash: <hash>
     permissions: [<group1>, <group2>, ...]
`
Name defines a username (login). Name “admin” is forbidden since the admin user is created automatically with full permissions and a password of “ligato123”
Password must be hashed. It is possible to use the password-hasher utility to assist with this function. Password must also be hashed with the same cost value, as defined in the REST conf file like so:
password-hash-cost: <number>Minimal hash cost is 4, maximal value is 31. The higher the cost, the more CPU time/memory is required to hash the password.
Permission Groups define a list of permissions composed of allowed URLs and methods. Every user requires at least one permission group defined, otherwise the user will be excluded from access to any server. Permission groups described in the access security proto.
To add a permission group, use a rest plugin API:
RegisterPermissionGroup(group ...*access.PermissionGroup)Every permission group has a name and a list o permissions. Permission defines a URL and a list of methods which may be performed.
To add permission group to the user, put its name to the conf file under user field permissions.
Login/Logout#
To log in a user, follow the URL http://localhost:9191/login. The site is enabled for two methods. It is possible to use a POST to directly provide credentials in the format:
{
    "username": "<name>",
    "password": "<pass>"
}
The site returns the access token in plain text. If the URL is accessed with GET, it displays the login page where the credentials can be entered. After a successful submit, the user is redirected to the index.
To log out, post the username to http://localhost:9191/logout.
{
    "username": "<name>"
}
GRPC Plugin#
The gRPC plugin enables applications and plugins to utilize gRPC APIs to interact with other system components, including the VPP agent.
References
The GRPC plugin supports the following:
- Send configuration data to VPP
- Retrieve (dump) configuration from VPP
- Start a notification watcher
gRPC defines the following remote procedure calls:
- Get creates a new configuration, or updates an existing configuration
- Delete removes an existing configuration
- Dump reads existing configuration data from VPP
- Notify subscribes gRPC to the notification service
To enable the GRPC server, you must add the gRPC plugin to the plugin pool and then load it. Currently, the configurator plugin dependencies include the gRPC plugin. You must define the endpoint in the gRPC conf file.
Configuration#
Clients can reach the GRPC Server with an endpoint IP:Port address, or by a unix domain socket file. The GRPC endpoint is the address of the gRPC netListener.
You can modify the endpoint address:Port address by using the port flag, or by modifying the GRPC conf file.
GRPC port flag:
-grpc-port=<port>Endpoint field in the GRPC conf file:
endpoint: 0.0.0.0:9191If you use the unix domain socket file, you can modify the network field of the GRPC conf file:
network: tcpThe default is TCP. You can also set this field to other types that include TCP6, unix, and unixpacket.
Plugin API#
Your application plugins handle gRPC using the following step in order:
- gRPC plugin starts the gRPC server + net listener in its own goroutine.
- Plugins register their handlers with the
GRPC Plugin. To service gRPC requests, a plugin must implement a handler function and register it at a given URL path using theRegisterServicemethod. The gRPC plugin uses an GRPC request multiplexer fromgrpc/Server. - GRPC server routes gRPC requests to their respective registered handlers using the
grpc/Server.
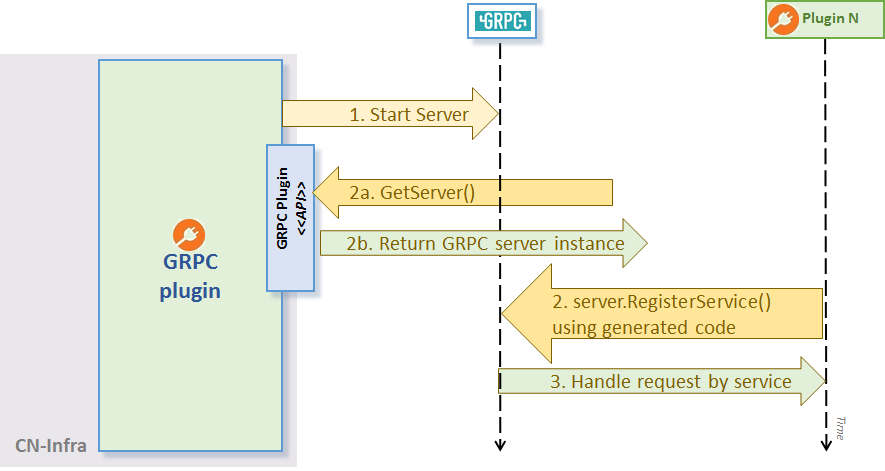
GRPC Plugin API
The gRPC server example demonstrates the usage of the plugin API GetServer():
// Register our GRPC request handler/service using generated RegisterGreeterServer:
RegisterGreeterServer(plugin.GRPC.Server(), &GreeterService{})
Once the handler registers with the GRPC plugin, you have an up and running agent. Now, you can use a gRPC client to call the service.
gRPC examples and tutorials
- GRPC client example shows how to create a client for the GRPC Server
- GRPC server example shows how to create a GRPC Server
- GRPC handler tutorial
- GRPC VPP notifications example
- GRPC VPP configuration example