Connection Plugins
REST plugin
The REST plugin in the vpp-agent is currently limited to retrieving existing VPP configuration (called dumping). The vpp-agent also provides a simple html template (usable in browser) and optional support for https security, authentication and authorization.
The Ligato Framework supports two distinct HTTP plugins:
- Ligato Infra (aka CN-infra) REST/HTTPMux Plugin for general HTTP functionality and security
- vpp-agent REST plugin applicable to VPP implementations
Basics
REST plugin functionality is enabled without the need for any external configuration file. The default HTTP endpoint is opened on socket 0.0.0.0:9191.
There are several options for configuring a different port number:
- Set the vpp-agent flag:
-http-port=<port> - Set the environment
HTTP_PORTvariable to a desired value - Modify the REST plugin config file
Supported URLs
The vpp-agent REST plugin supports the retrieval of configuration items sorted by type (interfaces, L3 routes, telemetry, etc.).
Index Page
Index of supported API URLs.
curl -X GET http://localhost:9191/Access lists
# ACL IP
/dump/vpp/v2/acl/ip

# ACL MAC IP
/dump/vpp/v2/acl/macip
VPP Interfaces
# All interfaces
/dump/vpp/v2/interfaces

# Loopback
/dump/vpp/v2/interfaces/loopback

# Ethernet
/dump/vpp/v2/interfaces/ethernet

# Memory interface
/dump/vpp/v2/interfaces/memif

# Tap
/dump/vpp/v2/interfaces/tap

# VxLAN tunnel
/dump/vpp/v2/interfaces/vxlan

# Af-Packet interface
/dump/vpp/v2/interfaces/afpacket
Linux Interfaces
/dump/linux/v2/interfacesL2 plugin
# Bridge domains
/dump/vpp/v2/bd

# FIB entries
/dump/vpp/v2/fib

# Cross-connects
/dump/vpp/v2/xc
L3 plugin
# Routes
/dump/vpp/v2/routes

# ARPs
/dump/vpp/v2/arps

# Proxy ARP interfaces
dump/vpp/v2/proxyarp/interfaces

# Proxy ARP ranges
/dump/vpp/v2/proxyarp/ranges

# IP scan neighbor
/dump/vpp/v2/ipscanneigh
Linux L3 plugin
# Linux routes
/dump/linux/v2/routes

# Linux ARPs
/dump/linux/v2/arps
NAT plugin
# REST path of a NAT
/dump/vpp/v2/nat

# Global NAT config
/dump/vpp/v2/nat/global

# DNAT configurations
/dump/vpp/v2/nat/dnat
IPSec plugin
# REST path of the SPD
/dump/vpp/v2/ipsec/spds

# REST path of the SA
/dump/vpp/v2/ipsec/sas
Punt plugins
# REST path of the punt socket register
/dump/vpp/v2/punt/sockets
VPP CLI
Use the VPP CLI command via REST. Commands are defined as a map as following:
/vpp/command -d '{"vppclicommand":"<command>"}'Telemetry
/vpp/telemetry
/vpp/telemetry/memory
/vpp/telemetry/runtime
/vpp/telemetry/nodecount
Tracer
/vpp/binapitraceSecurity
Configurable security functions:
- server certificate (HTTPS)
- Basic HTTP Authentication - username & password
- client certificates
- token based authorization
All are disabled by default and can be enabled by a config file:
endpoint: 127.0.0.1:9292
server-cert-file: server.crt
server-key-file: server.key
client-cert-files:
  - "ca.crt"
client-basic-auth:
  - "user:pass"
  - "foo:bar"
If server-cert-file and server-key-file are defined, the server requires HTTPS instead of HTTP for all its endpoints.
client-cert-files is the list of the root certificate authorities the server uses to validate client certificates. If the list is not empty, only clients who provide a valid certificate are allowed to access the server.
client-basic-auth allows one to define user/password credentials permitting access to the server. The config option defines a static list of allowed user(s). If the list is not empty, default staticAuthenticator is instantiated. Alternatively, you can implement custom authenticator and inject it into the plugin (e.g.: if you want to read credentials from etcd).
Example
In order to generate self-signed certificates, with the following commands:
#generate key for "Our Certificate Authority"
openssl genrsa -out ca.key 2048

#generate certificate for CA
openssl req -new -nodes -x509 -key ca.key -out ca.crt  -subj '/CN=CA'

#generate certificate for the server assume that server will be accessed by 127.0.0.1
openssl genrsa -out server.key 2048
openssl req -new -key server.key -out server.csr -subj '/CN=127.0.0.1'
openssl x509 -req -extensions client_server_ssl -extfile openssl_ext.conf -in server.csr -CA ca.crt -CAkey ca.key -CAcreateserial -out server.crt

#generate client certificate
openssl genrsa -out client.key 2048
openssl req -new -key client.key -out client.csr -subj '/CN=client'
openssl x509 -req -in client.csr -CA ca.crt -CAkey ca.key -CAcreateserial -out client.crt -days 360
Once the security features are enabled, the endpoint can be accessed by the following commands:
-
HTTPSwhereca.pemis a certificate authority where server certificate should be validated (in case of self-signed certificates)curl --cacert ca.crt https://127.0.0.1:9292/log/list -
HTTPS + client certwhereclient.crtis a valid client certificate.curl --cacert ca.crt --cert client.crt --key client.key https://127.0.0.1:9292/log/list -
HTTPS + basic authwhereuser:passis a valid username password pair.curl --cacert ca.crt -u user:pass https://127.0.0.1:9292/log/list -
HTTPS + client cert + basic authcurl --cacert ca.crt --cert client.crt --key client.key -u user:pass https://127.0.0.1:9292/log/list
Token-based Authorization
REST plugin supports authorization based on tokens. To enable this feature, use the paramter contained in the REST plugin config file:
enable-token-auth: trueAuthorization restricts access to all registered permission group URLs. The user receives a token after login, which grants access to all permitted sites. The token is valid until the user is logged out, or until it expires.
The expiration time is a token claim set in the REST plugin config file:
token-expiration: 600000000000 Note that time is in nanoseconds. If no time is provided, the default value of 1 hour is set.
Token uses by default a pre-defined signature string as the key to sign it. This can be changed in REST plugin config file.
token-signature: <string>After login, the token is required in an authentication header in the format Bearer <token>, so it can be validated. If the REST interface is accessed via a browser, the token is written to cookie file.
Users and Permission Groups
Users must be pre-defined in the http.conf file. User definitions consists of a name, hashed password and permission groups.
Name defines a username (login). Name “admin” is forbidden since the admin user is created automatically with full permissions and password “ligato123”
Password must be hashed. It is possible to use password-hasher utility to assist with this function. Password must also be hashed with the same cost value, as defined in the configuration file:
password-hash-cost: <number>Minimal hash cost is 4, maximal value is 31. The higher the cost, the more CPU time/memory is required to hash the password.
Permission Groups define a list of permissions composed of allowed URLs and methods. Every user needs at least one permission group defined, otherwise the user will be excluded from access to any server. Permission groups described in the proto model.
To add permission group, use a rest plugin API:
RegisterPermissionGroup(group ...*access.PermissionGroup)Every permission group has a name and a list o permissions. Permission defines URL and a list of methods which may be performed.
To add permission group to the user, put its name to the config file under user’s field permissions.
Login and logout
To log in a user, follow the URL http://localhost:9191/login. The site is enabled for two methods. It is possible to use a POST to directly provide credentials in the format:
{
    "username": "<name>",
    "password": "<pass>"
}
The site returns the access token in plain text. If the URL is accessed with GET, it displays the login page where the credentials can be entered. After successful submit, it redirects to the index.
To log out, post the username to http://localhost:9191/logout.
{
    "username": "<name>"
}
Basic usage
1. cURL
Specify the vpp-agent target HTTP IP address and port with link to desired data. All URLs are accessible via the GET method.
Example:
curl -X GET http://localhost:9191/dump/vpp/v2/interfaces2. Postman
Choose the GET method, provide the desired URL and send the request.
vpp-agent GRPC
Related articles:
- GRPC client tutorial shows how to create a client for the off-the-shelf vpp-agent’s GRPC Server
- GRPC server tutorial shows how to create your own GRPC Server using the CN-Infra GRPC Plugin.
GRPC support in the vpp-agent is provided by the CN-Infra GRPC plugin that implements handling of GRPC requests.
The vpp-agent GRPC plugin can be used to:
- Send configuration data to VPP
- Retrieve (dump) configuration from VPP
- Start a notification watcher
The following remote procedure calls are defined:
- Get creates new configuration or updates and existing configuration.
- Delete removes a specified (existing) configuration.
- Dump (Retrieve) reads existing configuration from the VPP
- Notify subscribes GRPC to the notification service
To enable the GRPC server within the vpp-agent, the GRPC plugin must be added to the plugin pool and loaded (currently the GRPC plugin is a part of the Configurator plugin dependencies). The plugin also requires a startup configuration file (see CN-Infra GRPC plugin), where the endpoint is defined.
Clients can reach the GRPC Server via an endpoint IP:Port address or via a unix domain socket file. The TCP network is set as default, but other network types are also possible (like TCP6 or UNIX).
GRPC Plugin
The GRPC Plugin is an infrastructure plugin that enables app plugins to handle GRPC requests (see the GRPC Plugin API figure below) as follows:
- The GRPC Plugin starts the GRPC server + net listener in its own goroutine
- Plugins register their handlers with the
GRPC Plugin. To service GRPC requests, a plugin must implement a handler function and register it at a given URL path using theRegisterServicemethod.GRPC Pluginuses an GRPC request multiplexer fromgrpc/Server. - The GRPC Server routes GRPC requests to their respective registered handlers using the
grpc/Server.
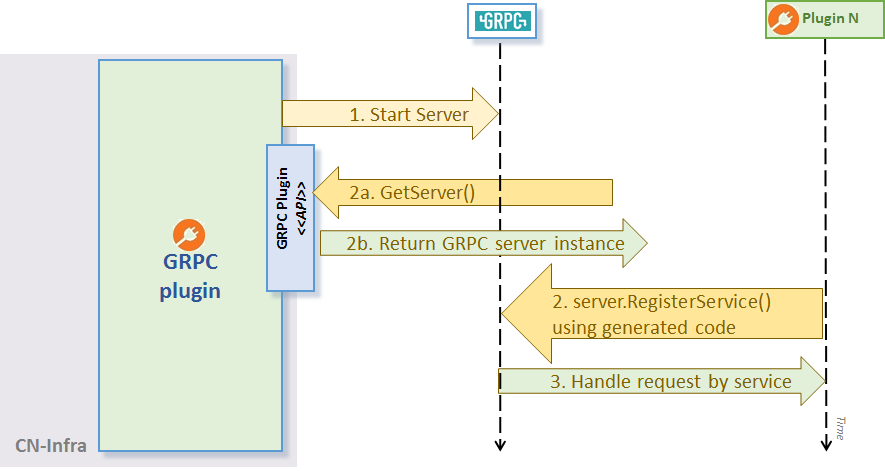
GRPC Plugin API
Configuration
- The GRPC Server’s port can be defined using the commandline flag
grpc-portor via the environment variable GRPC_PORT.
Example
The grpc-server greeter example demonstrates the usage of the GRPC Plugin plugin API GetServer():
// Register our GRPC request handler/service using generated RegisterGreeterServer:
RegisterGreeterServer(plugin.GRPC.Server(), &GreeterService{})
Once the handler is registered with the GRPC Plugin and the agent is running, you can use a grpc client to call the service .