Concepts
This section will describe several key concepts of the Ligato vpp-agent and Infra.
Note
The documentation in some cases may refer to the Ligato Infra as cloud native-infra or cn-infra for short.
What is a Model?
The model represents an abstraction of an object (e.g. VPP interface) that can be managed through northbound APIs exposed by the vpp-agent. More specifically the model is used to generate a key associated with a value for the object that is stored in a KV data store such as etcd.
Model Components
- model spec
- protobuf message (
proto.Message) - name template (optional)
A single protobuf message can only be represented by a single model.
Model Specification
Model spec (specification) describes the model using the module, version and type fields:
module- groups models belonging for the same configuration entity. For example, models for VPP configuration have vpp module, models for Linux configuration have linux module, etc.version- current version of the vpp-agent API. The version only changes upon release of a new version.type- keyword describing the given model (e.g. interfaces, bridge-domains, etc.)
These three parts are used to generate a model prefix. The model prefix is part of a key and uses the following format:
config/<module>/<version>/<type>/This is an important concept so let’s look at some examples.
Here is the key for a VPP interface:
/vnf-agent/vpp1/config/vpp/v2/interfaces/<name>Inside that key is the model prefix of ../vpp/v2/interfaces where:
Module = vpp
version = v2
type = interfaces
An example of this key in action was shown in section 5.1 of the Quickstart Guide. It was used to program a VPP loopback interface with the value of an IP address for insertion into an etcd KV data store.
$ docker exec etcd etcdctl put /vnf-agent/vpp1/config/vpp/v2/interfaces/loop1 \
'{"name":"loop1","type":"SOFTWARE_LOOPBACK","enabled":true,"ip_addresses":["192.168.1.1/24"]}'
Note that the value of loop1 is the <name> of the interface.
Key-Value Data Store Overview
This section describes how the Ligato vpp-agent works with KV data stores.
Note
There are a number of similar terms in this documentation and elsewhere used to define what is essentially a data store or database of key-value (KV) pairs or more generally structured data objects. These terms include but are not limited to KV database, KVDB, KV store and so on. Unless otherwise noted, we will use the term KV data store in the documentation text in this section and elsewhere in the documentation. The term KVDB might appear in the code examples and this will remain as is.
Connector is a term that applies to any plugin providing access or connectivity to an external entity such as a KV data store. The etcd plugin is considered a connector.
Why the KV Data Store?
The vpp-agent uses an external KV data store for several reasons:
- persist the desired state of the VPP/Linux configuration
- serve as a mechanism to store and export certain VPP statistics
- exploit the
"watch"paradigm for distributed configuration management in which the client (i.e. vpp-agent) listens for and processes config changes maintained in a KV data store. This same approach is incorporated into other configuration systems such as confd
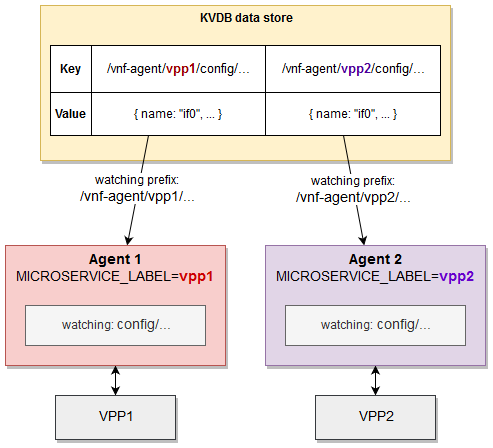
Each vpp-agent is defined with a label known as the microservice label. Just as Kubernetes uses labels attached to objects (e.g. pods) to group resources with certain common attributes (e.g. “these pods with this label are part of this service”), Ligato uses the microservice label to group vpp-agents watching for KV data store config changes with a common prefix - a “watch key” if you will.
What are the mechanics of this? First we take /vnf-agent/ and combine it with the microservice label (using vpp1 as an example) to form /vnf-agent/vpp1. This might look familiar because it is in fact part of the key associated with a configuration value maintained inside a KV data store.
Once again, here is the key for a VPP interface:
/vnf-agent/vpp1/config/vpp/v2/interfaces/<name>Next, the vpp-agent watches for any config changes in the KV data store with a matching watch key prefix. In the figure below, vpp-agent 1 on the left with a microservice label = vpp1 will only watch for config changes with a matching prefix of /vnf-agent/vpp1/. vpp-agent 1 does not care about nor is it watching KV data store config data with a prefix of /vnf-agent/vpp2/
The vpp-agent validates the key prefix (in the format /vnf-agent/<microservice-label> as explained above) and if the label matches, the KV pair is passed to the vpp-agent configuration watchers. If the prefix of the rest of the key is registered, the KV pair is sent to a articular watcher for processing such a re-programming the VPP dataplane.
There is quite a bit of flexibility in this architecture.
- individual KV data store can support multiple vpp-agent “groups”.
- vpp-agent can receive config data from multiple sources (e.g. KV data store, GRPC, etc.). A special orchestrator plugin synchronizes and resolves any conflicts from the individual sources thus presenting a single source appearance to the vpp-agent configuration plugins.
It should be noted that the vpp-agent does not require a KV data store. Configuration data can be provided via GRPC, potentially REST, the Clientv2 API and CLI. That said, a KV data store such as etcd offers the most convenient method for managing and distributing configuration data.
Which KV Data Store can I Use?
Note
Some of the items below are technically speaking KV data stores. Some are databases. To avoid acronym bloat, this section will continue to use the KV data store to include the database options below as well as the actual key-value data stores.
Technically any. The vpp-agent provides connectors to several types of KV data stores (see the list below). All are built on a common abstraction (called kvdbsync). The kvdb abstraction approach simplifies the changing out of a KV data store or database with a minimum of effort.
Let’s have a look at an example:
import (
    "github.com/ligato/cn-infra/db/keyval/etcd"
    // ...
)

func New() *VPPAgent {
    // Prepare KVDB sync plugin with ETCD as a connector
    etcdDataSync := kvdbsync.NewPlugin(kvdbsync.UseKV(&etcd.DefaultPlugin))

    // Put the KVDB sync to a list of proto watchers
    watchers := datasync.KVProtoWatchers{
        etcdDataSync,
    }
    // Provide connection to the orchestrator (or any other plugin)
    orchestrator.DefaultPlugin.Watcher = watchers

    // Other plugins
    ....
}
The code above prepares the kvdbsync plugin with the etcd plugin as a connector. The kvdbsync plugin can serve as a watcher to other plugins or a writer if passed as the KVProtoWriters object.
Let’s switch to Redis:
import (
    "github.com/ligato/cn-infra/db/keyval/redis"
    ...
)

func New() *VPPAgent {
    // Change KVDB sync plugin to use Redis connector
    redisDataSync := kvdbsync.NewPlugin(kvdbsync.UseKV(&redis.DefaultPlugin))

    watchers := datasync.KVProtoWatchers{
        redisDataSync,
    }
    orchestrator.DefaultPlugin.Watcher = watchers

    // Other plugins
    ....
}
The orchestrator now connects to a Redis database.
To add support for a new KV data store, one need only write a plugin that can establish a connection to this new data store and wire it up with the kvdbsync plugin.
etcd
More information: etcd documentation
etcd is a distributed KV data store that provides data read-write capabilities. etcd can be started on a local machine in its own container with the following command:
sudo docker run -p 2379:2379 --name etcd --rm \
    quay.io/coreos/etcd:v3.1.0 /usr/local/bin/etcd \
    -advertise-client-urls http://0.0.0.0:2379 \
    -listen-client-urls http://0.0.0.0:2379
The vpp-agent must start with the kvdbsync plugin using etcd as a connector.
Note
There is the example above or you can look over the code in this example. Information where etcd is running (IP address, port) must be provided upon etcd startup via the configuration file.
The minimal content of the file may look as follows:
endpoints:
  - "172.17.0.1:2379"
The etcd config file is passed to the vpp-agent using the flag --etcd-confg=<path>. The file contains more fields where etcd-specific parameters can be set (e.g. dial timeout, certification, compaction, etc.). See the guide to config files for more details.
Note that if the config file is not provided, the connector plugin will not be started and no connection will be established. If the etcd server is not reachable, the vpp-agent may not start at all.
The recommended tool to manage etcd data is etcdctl.
Redis
More information: Redis documentation
Redis is another type of in-memory data store, that can function as a database, cache or message broker.
Follow this guide to learn how to install redis-server on any machine.
The vpp-agent must start with the kvdbsync plugin using Redis as a connector (see code above or look over the code inside this example). Information where the Redis is running (IP address, port) must be provided to the vpp-agent at startup via the configuration file.
The content of the .yaml configuration file:
endpoint: localhost:6379The config file is provided to the vpp-agent using the flag --redis-config=<path>. See guide to config files to learn more about Redis configuration.
Note that if the Redis config file is not provided, the connector plugin will not be started and no connection will be established. If the Redis server is not reachable, the vpp-agent may not start at all.
The recommended tool to manage a Redis database is the redis-cli tool.
Important
The Redis server is by default started with keyspace event notifications disabled. It means, no data change events are forwarded to the watcher. To enable this, use the config SET notify-keyspace-events KA command directly in the redis-cli, or change the settings in the Redis server startup config.
Consul
More information: consul documentation
Consul is a service mesh solution providing a full featured control plane with service discovery, configuration, and segmentation functionality. The Consul plugin provides access to a Consul KV data store. The location of the Consul configuration file is defined using the flag consul-config or set via the CONSUL_CONFIG environment variable.
Bolt
Bolt is low-level, simple and fast KV data store. The Bolt plugin provides an API to the Bolt server.
FileDB
More information: fileDB documentation
fileDB is unique in that it uses the host OS filesystem as a database. The key-value configuration is stored in text files in a defined path. The fileDB connector works like any other KV data store connector, reacts on data change events (file edits) in real time and supports all kvdb features (resync, versioning, microservice labels, …).
The fileDB is not a process, so it does not need to be started - the vpp-agent only requires correct permissions to access configuration files and write access if the status is published.
The configuration file format can be .json or .yaml.
fileDB requires the config file to load, using the flag --filedb-config=<path>.
Example config file:
configuration-paths: [/path/to/directory/or/file.txt]In this case, absence of the config file does not prevent the vpp-agent from starting, since the configuration files can be created at a later point.
The configuration file can be edited with any text editor such as vim.
How to Use a KV Data Store in a Plugin
In the plugin which intends to use a KV data store connection for publishing or watching, fields of this type are used:
import (
    "github.com/ligato/cn-infra/datasync"
    ...
}

type Plugin struct {

    ...

    Watcher    datasync.KeyValProtoWatcher
    Publisher datasync.KeyProtoValWriter
}
Prepare the connector in the application plugin definition and set it to the example plugin:
func New() *VPPAgent {
    // Prepare KVDB connector writer and watcher
    etcdDataSync := kvdbsync.NewPlugin(kvdbsync.UseKV(&etcd.DefaultPlugin))
    watchers := datasync.KVProtoWatchers{
        etcdDataSync,
    }
    writers := datasync.KVProtoWriters{
        etcdDataSync,
    }

    // Pass connector to the plugin:
    plugin.Defaultplugin.Watcher = etcdDataSync
    plugin.Defaultplugin.Publisher = etcdDataSync

    ...
}
Watcher
Back in the plugin, start the watcher. The watcher requires two channel types: datasync.ChangeEvent and datasync.ResyncEvent and a set of key prefixes to watch:
p.resyncEventChannel := make(chan datasync.ResyncEvent)
p.changeEventChannel := make(chan datasync.ChangeEvent)
keyPrefixes := []string{<prefixes>...}

watchRegistration, err = p.Watcher.Watch("plugin-resync-name", p.resyncEventChannel, p.changeEventChannel, keyPrefixes)
Data change and resync events arrive on a particular channel, so the next step is to start the watcher in a new go routine:
func (p *Plugin) watchEvents() {
    for {
        select {
        case e := <-p.resyncEventChannel:
            // process resync event
        case e := <-p.changeEventChannel:
            // process data change event
        case <-p.ctx.Done():
            //exit
        }
    }
}
It is a good practice to start the event watcher before the watcher registration.
Publisher
Nothing special is required for the publisher. The KeyProtoValWriter object defines a method Put(<key>, <value>, <variadic-options>) which allow the key-value pair to be saved in the data store. No Delete() method is defined. Objects can be removed by sending null data with the associated key.
VPP Configuration Order
A drawback of VPP is that the dependency relations of various configuration items is quite strict. The ability of VPP to manage this is limited, or not present at all. There are two problems to address:
- A configuration item dependent on any other configuration item cannot be created “in advance”. The dependency must be addressed first.
- If the dependency item is removed, VPP behavior is not consistent. In other cases, the dependency item is removed as expected but VPP itself becomes unmanageable.
Configuration Order using VPP CLI
Interfaces are the most basic type of VPP configuration. After interface creation, VPP generates an index which serves as a reference for other configuration items using interfaces (i.e. bridge domains, routes, ARP entries, …). Other items, such as FIBs may have more complicated dependencies involving additional configuration types.
Example:
Start with the empty VPP and configure an interface:
vpp# create loopback interface
loop0
vpp#
The interface loop0 was added and the interface index (and name) was generated. The index can be shown by show interfaces.
Set the interface to the UP state. The interface name is required.
vpp# set interface state loop0 up
vpp#
Now let’s create a bridge domain:
vpp# create bridge-domain 1 learn 1 forward 1 uu-flood 1 flood 1 arp-term 1
bridge-domain 1
vpp#
The bridge domain is currently empty, so let’s assign our interface to it:
vpp# set interface l2 bridge loop0 1
vpp#
We set loop0 to bridge domain with index 1. Again, we cannot use a non-existing interface since the names are generated at interface creation. We also cannot use a non-existing bridge domain.
At last, let’s configure the FIB table entry:
vpp# l2fib add 52:54:00:53:18:57 1 loop0
vpp#
The call contains dependencies on the loop0 interface and on our bridge domain with ID=1. From the example steps above, we see that the order of CLI commands must follow this strict sequence.
Now remove the interface:
vpp# delete loopback interface intfc loop0
vpp#
If we check the FIB table with show l2fib details, we will see the interface name was changed from loop0 to Stale.
Remove the bridge domain. The command is:
vpp# create bridge-domain 1 del
vpp#
Here is where we get into trouble, since the output of show l2fib verbose is still the same:
vpp# sh l2fib verbose
    Mac-Address     BD-Idx If-Idx BSN-ISN Age(min) static filter bvi         Interface-Name
 52:54:00:53:18:57    1      1      0/0      no      *      -     -               Stale
L2FIB total/learned entries: 2/0  Last scan time: 6.6309e-4sec  Learn limit: 4194304
vpp#
But an attempt to remove the FIB entry is invalid:
vpp# l2fib del 52:54:00:53:18:57 1
l2fib del: bridge domain ID 1 invalid
vpp#
So we end up with a configuration that cannot be removed until the bridge domain is re-created. To avoid similar scenarios and provide more flexibility in the configuration order, the vpp-agent uses an automatic configuration order mechanism.
Configuration Order using the Ligato vpp-agent
The vpp-agent employs a northbound (NB) API definition for every supported configuration type (or item). NB interface configuration through an API creates the interface itself, sets its state, MAC address, IP addresses and so on. The vpp-agent goes even further - it permits the configuration of VPP items with non-existent references. Such an item is not really configured, but the vpp-agent “remembers” it and programs VPP when possible, thus removing the strict VPP configuration ordering constraint.
Note
This part requires a basic setup to be prepared (vpp-agent + VPP + etcd). The steps to achieve this are covered in the quick start guide.
Let’s begin from the end and program the FIB entry into VPP:
etcdctl put /vnf-agent/vpp1/config/vpp/l2/v2/fib/bd1/mac/62:89:C6:A3:6D:5C '{"phys_address":"62:89:C6:A3:6D:5C","bridge_domain":"bd1","outgoing_interface":"if1","action":"FORWARD"}'Have a look at the vpp-agent output of planned operations:
1. CREATE [NOOP IS-PENDING]:
  - key: config/vpp/l2/v2/fib/bd1/mac/62:89:C6:A3:6D:5C
  - value: { phys_address:"62:89:C6:A3:6D:5C" bridge_domain:"bd1" outgoing_interface:"if1" }
There is one CREATE transaction planned - our FIB entry with interface if1 and bridge domain bd1. None of these exist, so the transaction was postponed, highlighting it as [NOOP IS-PENDING].
Configure the bridge domain:
etcdctl put /vnf-agent/vpp1/config/vpp/l2/v2/bridge-domain/bd1 '{"name":"bd1","interfaces":[{"name":"if1"}]}'We have created a simple bridge domain with an interface. Let’s parse the output:
1. CREATE:
  - key: config/vpp/l2/v2/bridge-domain/bd1
  - value: { name:"bd1" interfaces:<name:"if1" >  }
2. CREATE [DERIVED NOOP IS-PENDING]:
  - key: vpp/bd/bd1/interface/tap1
  - value: { name:"if1" }
Now there are two planned operations - the first is the bridge domain bd1 which can be created with no restrictions. The second contains the following highlight: [DERIVED NOOP IS-PENDING]. DERIVED means that this item was processed as a separate key within the vpp-agent (it is internal functionality so let’s not bother with it for now). The rest of the flag is the same as before, meaning that the value if1 is not present yet.
Next step is to add the interface:
etcdctl put /vnf-agent/vpp1/config/vpp/v2/interfaces/tap1 '{"name":"tap1","type":"TAP","enabled":true}The output:
1. CREATE:
  - key: config/vpp/v2/interfaces/tap1
  - value: { name:"if1" type:TAP enabled:true }
2. CREATE [DERIVED WAS-PENDING]:
  - key: vpp/bd/bd1/interface/tap1
  - value: { name:"if1" }
3. CREATE [WAS-PENDING]:
  - key: config/vpp/l2/v2/fib/bd1/mac/62:89:C6:A3:6D:5C
  - value: { phys_address:"62:89:C6:A3:6D:5C" bridge_domain:"bd1" outgoing_interface:"if1" }
There are three planned operations present. The first one is the interface itself, which was created and enabled.
The second operation is marked as DERIVED (again not important) and WAS-PENDING meaning the cached value could be resolved. This operation means that the interface was added to the bridge domain as defined in the bridge domain configuration.
The last statement is marked WAS-PENDING as well and represents our FIB entry, cached until now. Since all dependencies were fulfilled (the bridge domain and the interface as a part of it), the FIB was configured.
Now let’s try to remove the bridge domain as before:
etcdctl del /vnf-agent/vpp1/config/vpp/l2/v2/bridge-domain/bd1The output:
1. DELETE [IS-PENDING]:
  - key: config/vpp/l2/v2/fib/bd1/mac/62:89:C6:A3:6D:5C
  - value: { phys_address:"62:89:C6:A3:6D:5C" bridge_domain:"bd1" outgoing_interface:"if1" }
2. DELETE [DERIVED]:
  - key: vpp/bd/bd1/interface/tap1
  - value: { name:"if1" }
3. DELETE:
  - key: config/vpp/l2/v2/bridge-domain/bd1
  - value: { name:"bd1" interfaces:<name:"if1" > }
Notice that the first operation was the removal of the FIB entry. The value was not discarded by the vpp-agent because it still exists in the etcd data store. The vpp-agent places the value back into cache. This is an important step since the FIB entry is removed before the bridge domain. Thus it will not be accidentally mis-configured and stranded in VPP.
The value no longer exists in VPP since logically it is not possible without all dependencies met. But if the bridge domain reappears, the FIB will be added back in without any external intervention.
The second step means that the interface if1 was removed from the bridge domain prior to its removal in the last step of the transaction.
The ordering and caching of the configuration described in this section is performed by the KVScheduler plugin. For more information on how this works, please refer to the discussion of the KVScheduler.
VPP Multi-Version Support
The vpp-agent is highly dependent on the version of the VPP binary API used to send and receive various configuration message types. The VPP API is evolving and changing over time, adding new binary calls or, modifying or removing existing ones. The latter is the most crucial from the vpp-agent perspective since it introduces incompatibilities between vpp-agent and VPP.
For that reason the vpp-agent performs a compatibility check in the GoVPP multiplex plugin. Note that the GoVPP component provides an API for communication with VPP. The compatibility check attempts to read the message ID. If just one message ID is not found per validation in the cyclic redundancy code, VPP is considered incompatible and the vpp-agent will not connect. The message validation is essential for successful connection.
The vpp-agent is tightly bound to the version of VPP. For that reason, the vpp-agent image is shipped together with a compatible VPP dataplane version to make it easier and safer for users.
This function may cause some inconveniences during manual setup, and especially in scenarios where the vpp-agent needs to be quickly switched to a different VPP which may not be compatible.
VPP Compatibility
The vpp-agent bindings are generated from VPP JSON API definitions. Those can be found in the path /usr/share/vpp/api. Full VPP installation is required if definitions need to be generated. The JSON API definition is then transformed to the *.ba.go file using binapi-generator which is a part of the GoVPP project. All generated structures implement the GoVPP Message interface proving the message name, CRC or message type which represents the generic type for all messages which can be sent via the VPP channel.
Example:
type CreateLoopback struct {
    MacAddress []byte `struc:"[6]byte"`
}

func (*CreateLoopback) GetMessageName() string {
    return "create_loopback"
}
func (*CreateLoopback) GetCrcString() string {
    return "3b54129c"
}
func (*CreateLoopback) GetMessageType() api.MessageType {
    return api.RequestMessage
}
The code above is generated from create_loopback within interface.api.json. The structure represents the binary API request call, and usually contains a set of fields which can be set to the required values (e.g. MAC address of the loopback interface).
Every VPP request call requires a response:
type CreateLoopbackReply struct {
    Retval    int32
    SwIfIndex uint32
}

func (*CreateLoopbackReply) GetMessageName() string {
    return "create_loopback_reply"
}
func (*CreateLoopbackReply) GetCrcString() string {
    return "fda5941f"
}
func (*CreateLoopbackReply) GetMessageType() api.MessageType {
    return api.ReplyMessage
}
The response has a Retval field, which is 0 if the API call was successful. In an error is returned, the field contains a numerical index of a VPP-defined error message. Other fields can be present usually with information generated within VPP with the SwIfIndex of the created interface above as an example. Notice that the response message has the same name but with a Reply suffix. Other types of messages may provide information from VPP. Those API calls have a suffix of Dump and for them, the reply message contains a Details suffix).
If the JSON API was changed, it must be re-generated in the vpp-agent. All changes caused by the modified binary api structures must be resolved (e.g. new or modified data fields). This process can be time consuming as it depends on the size of the detected differences.
Multi-Version
In order to minimize updates for various VPP versions, the vpp-agent introduced multi-version support. The vpp-agent can switch to a different VPP version (with different APIs) without any changes to the vpp-agent itself and, without any need to rebuild the vpp-agent binary. Plugins can now obtain the version of the VPP and the vpp-agent to connect and initialize the correct set of vppcalls.
Every vppcalls handler registers itself with the VPP version it will support (e.g. vpp1810, vpp1901, etc.). During initialization, the vpp-agent performs a compatibility check with all available handlers, until it finds those compatible with required messages. The chosen handler must be in line with all messages, as it is not possible to use multiple handlers for a single VPP. When the compatibility check locates a workable handler, it is returned to the main plugin for use.
One small drawback of this solution is code duplication across vppcalls. This is a consequence of trivial API changes observed across different versions which happens to be the case in the majority of cases.
Client v2
Client v2 defines an API for configuration management of VPP and Linux plugins. How the configuration is transported between APIs and the plugins is fully abstracted from the user.
The API calls can be split into two groups:
- resync applies a given (full) configuration. An existing configuration, if present, is replaced. The name is an abbreviation of resynchronization. It is used initially and following any system event that may result in the configuration being out-of-sync. Recovering stale configuration options is impossible to determine locally (e.g. temporarily lost connection to the data store).
- data change delivers incremental configuration changes.
There are two Client v2 implementations:
- local client runs inside the same process as the vpp-agent and delivers configuration data through go channels directly to the plugins.
- remote client stores the configuration using the given
keyval.broker.
Plugin Configuration Files
Some plugins require external information to ensure proper behavior. An example is a database connector plugin such as etcd. By default, the plugin attempts to connect to a default IP address and port. If we want to connect to a different IP address or custom port, we need to pass this information to the plugin.
For that purpose, the vpp-agent plugins support config files. The plugin configuration file (or just config-file) is a small file with fields (every plugin can define its own set of fields), which can statically modify the initial plugin setup and change some aspects of its behavior.
Plugin Definition of the Config File
The configuration file is passed to the plugin via the vpp-agent flags. The command vpp-agent -h displays the list of all plugins supporting static config and can be set using the flag command:
vpp-agent -etcd-config=/opt/vpp-agent/dev/etcd.confAnother option is to set the related environment variable:
export ETCD_CONFIG=/opt/vpp-agent/dev/etcd.confThe provided config conforms to YAML syntax and is un-marshaled to a defined Config go structure. All fields are then processed, usually in the plugin Init(). It is good practice to always use default values in case the configuration file or any of its fields are not provided. This is so the plugin can be successfully started without it.
An example config file (in yaml format):
db-path: /tmp/bolt.db
file-mode: 0654
Every plugin supporting a configuration file defines its content as a separate structure. For example, here is the definition of the BoltDB config-file:
type Config struct {
    DbPath      string        `json:"db-path"`
    FileMode    os.FileMode   `json:"file-mode"`
    LockTimeout time.Duration `json:"lock-timeout"`
}
As one can see, the config file can contain multiple fields of various types together with the JSON struct tag. Lists and maps are also allowed. Notice that not all fields must be defined in the file itself - empty fields are set to default values or handled as not set.
A list of supported configuration files can be found here.