Infra Plugins#
This section describes infra plugins.
Status Check#
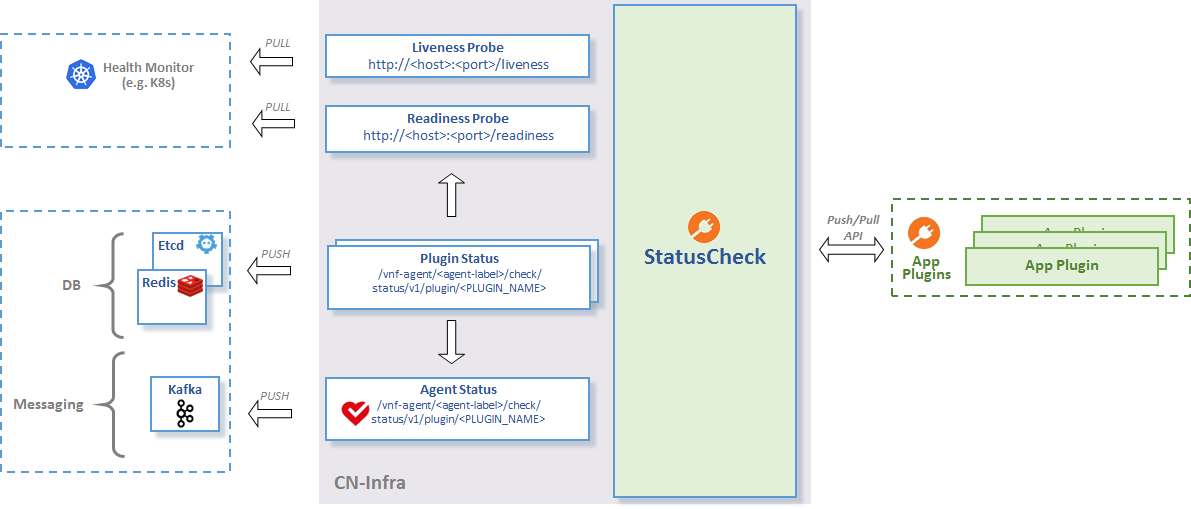
The status check plugin monitors the overall status of a cn-infra based application. It collects and aggregates the status of your agent plugins. The plugin exposes the status to external clients using agentctl status, etcdctl plugins, or REST.
StatusCheck API
References:
Overall Agent Status#
The status check plugin aggregates each plugin’s status, to arrive at the overall agent status. Conceptually, it performs a logical and on each plugin’s status to determine the overall agent status.
Key to retrieve current agent status:
/vnf-agent/<agent-label>/check/status`Example:
$ agentctl kvdb get /vnf-agent/<agent-label>/check/status/v1/agent
/vnf-agent/<agent-label>/check/status/v1/agent
{"build_version":"e059fdfcd96565eb976a947b59ce56cfb7b1e8a0","build_date":"2017-06-16.14:59","state":1,"start_time":1497617981,"last_change":1497617981,"last_update":1497617991}
You can verify agent status with HTTP by using the /liveness and /readiness URL endpoints.
// liveness example
$ curl -X GET http://localhost:9191/liveness
{"build_version":"e059fdfcd96565eb976a947b59ce56cfb7b1e8a0","build_date":"2017-06-16.14:59","state":1,"start_time":1497617981,"last_change":1497617981,"last_update":1497617991}

// readiness example
$ curl -X GET http://localhost:9191/readiness
{"build_version":"e059fdfcd96565eb976a947b59ce56cfb7b1e8a0","build_date":"2017-06-16.14:59","state":1,"start_time":1497617981,"last_change":1497617981,"last_update":1497617991}
You can change the HTTP server port by setting the http-port flag.
$ vpp-agent -http-port 9090Plugin Status#
Your plugins may use the PluginStatusWriter.ReportStateChange API to push status information. For optimal performance, the status check plugin propagates the status report to external clients, if and only if, status data has changed since the last update.
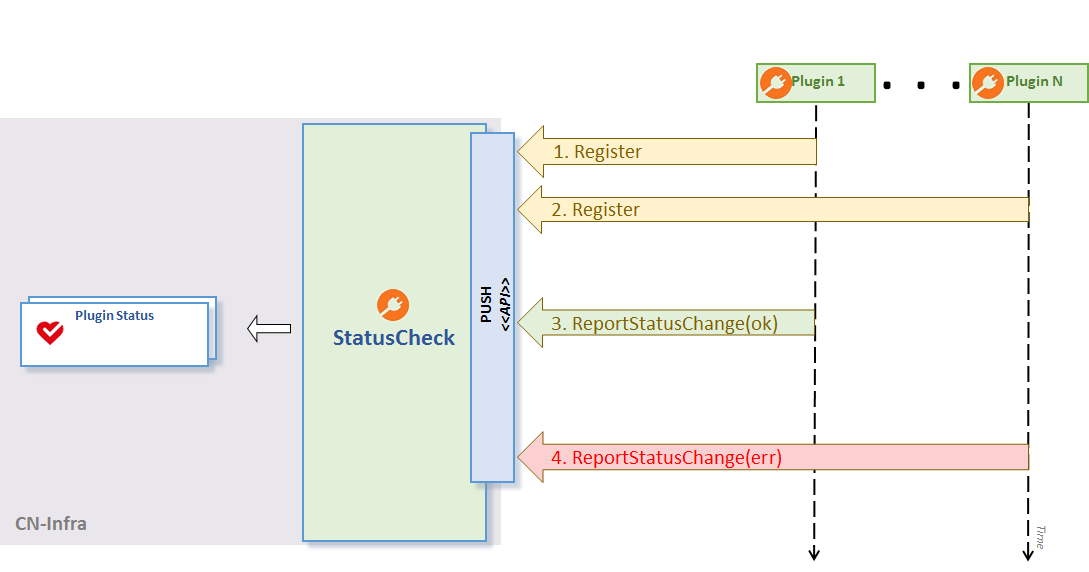
Plugin Status using Push approach
Alternatively, your plugins can use a pull-based approach, and define the probe function in the PluginStatusWriter.Register API. The status check periodically probes the plugin for the current status. Once again, the plugin propagates the status report, if and only if, status data has changed since the last update.
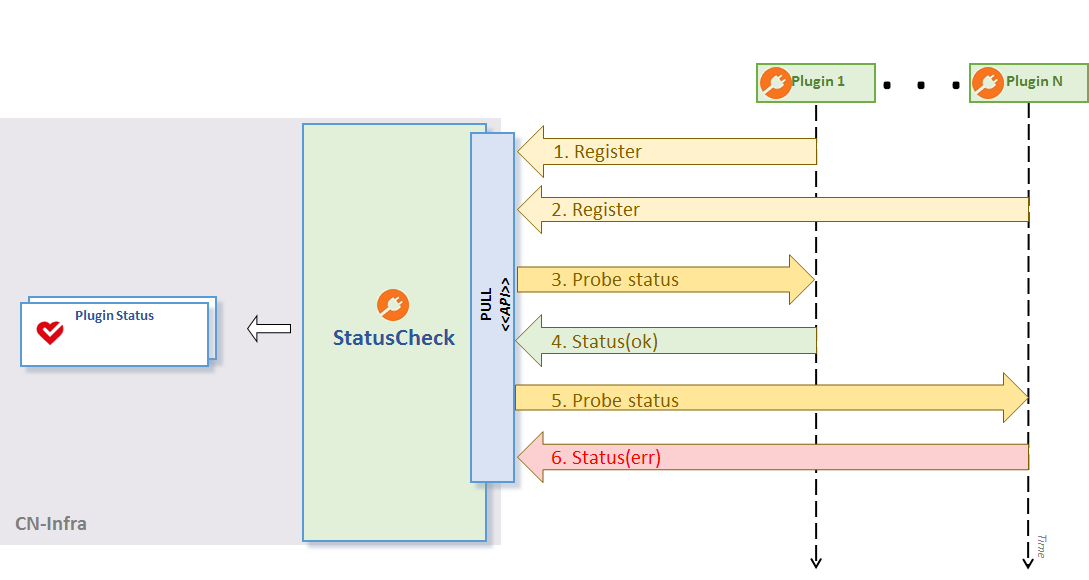
Plugin Status using Pull approach
Note
You should NOT mix the push and the pull approaches in the same plugin.
Key template to retrieve the plugin’s current status from etcd:
/vnf-agent/<agent-label>/check/status/v1/plugin/<PLUGIN_NAME>Example of GoVPPMux plugin status retrieval from etcd:
$ agentctl kvdb get /vnf-agent/<agent-label>/check/status/v1/plugin/GOVPP
/vnf-agent/<agent-label>/check/status/v1/plugin/GOVPP
{"state":2,"last_change":1496322205,"last_update":1496322361,"error":"VPP disconnected"}
The Plugin Status using Pull approach figure above illustrates this approach.
- Register your plugins for status checks in 1.- 2.
- Probe plugin status, return (ok) in 3. - 4.
- Probe plugin status, return (err) in 5. - 6.
Index Map#
The idxmap package provides a mapping structure to support the following use cases:
- Expose read-only access to plugin local data for other plugins.
- Secondary indexing.
- Data caching for a KV data store.
References:
Exposing Local Data Use Case#
App plugins often need to expose some structured data to other plugins inside the agent. You can provide read-only access to the structured plugin data written to the idxmap cache using the following:
- Lookup using primary keys or secondary indices.
- Watching for data changes in the map using channels or callbacks. You subscribe to channels that provide notifications for changes when you add, delete or remove a configuration item.

Using idxmap to expose local data
The Using idxmap to expose local data figure above depicts the lookup and watch methods.
Caching Use Case#
You will find it useful to cache data from a KV data store when you need to:
- Minimize the number of lookups into the KV data store.
- Execute lookups by secondary indexes for KV data stores that do not support secondary indexing. Not that etcd does not support secondary indexing.
CacheHelper turns the idxmap, injected as field IDX, into an indexed local copy of remotely stored key-value data. CacheHelper watches the target KV data store for data changes and resync events. It transforms the received key-value pairs into the name-value pairs, including secondary indices if defined. Cachehelper stores the transformed data in the injected idxmap instance.

idxmap caching
The idxmap caching figure shows how CacheHelper assists your plugins in accessing remote KV data store values through a local cache.
Log Manager#
The log manager plugin lets you view and modify the agent loggers and log levels using REST, agentctl, environment variables, and conf files.
References:
To read more on how to configure logging using REST, agentctl, environment variables and conf files, see How to setup logging.
You can change the agent’s per-logger or global log levels using a conf file, environment variable, agentctl, or REST.
The log level choices consist of one of the following:
debuginfowarningerrorfatalpanic
Using the environment variable
To set a global log level for all loggers, use the INITIAL_LOGLVL=<level> environment variable.
Note
INITIAL_LOGLVL=<level> overrides all entries contained in the logs.conf file.
Using agentctl log
- To manage individual log levels, use agentctl log.
List individual loggers and their log levels:
agentctl log listExample of setting the KV Scheduler log level to debug:
agentctl log set kvscheduler debugUsing REST
- List loggers and log levels:
curl -X GET http://localhost:9191/log/list- Set an individual logger’s log level:
curl -X POST http://localhost:9191/log/<logger-name>/<log-level>Using the Conf File
The conf file includes the following:
default-levellog level applied to all plugins.loggersmap defining individual loggers and associated log levels.hooksdefining a list of one or more links to external logs such as Logstath and Fluentd.
Example logs.conf file:
default-level: debug
loggers:
# - name: "defaultLogger"
#   level: info
 - name: "example"
   level: debug
 - name: "examplechildLogger"
   level: debug
hooks:
  syslog:
    levels:
    - panic
    - error
    - warn
#  custom:
#    addres: localhost
#    levels:
#    - panic
Note
Do not confuse “hooks” context. Log manager conf file hooks define links to external logs. Supervisor plugin hooks define actions to perform when an event occurs.
Tracer#
You can log events across time periods using the tracer utility.
References:
Create a new tracer:
t := NewTracer(name string, log logging.Logger)Store a new tracer entry:
t.LogTime(entity string, start Time)where entity denotes a string representation of a measured object, and start is the start time.
Tracer can measure a repeating event, as might occur in a loop for example. Tracer stores events with an index in an internal database. The tracer object contains a list of entries and overall time duration.
You can read all tracer measurements using:
t.Get()You can remove all tracer entries from the internal database using:
t.Clear()Messaging/Kafka#
The client package provides single purpose clients for publishing synchronous/asynchronous messages and for consuming selected topics.
The mux component implements the session multiplexer that allows multiple plugins to share a single connection to a Kafka broker. The mux package also implements the generic messaging API defined in the parent package.
Notes
For more details on the topics covered in this section, including examples, see Kafka package GoDoc
References:
Requirements#
The Sarama library determines the minimum supported version of Kafka you can use.
If you do not have Kafka installed locally, you can use the docker image for testing.
sudo docker run -p 2181:2181 -p 9092:9092 --name kafka --rm \
 --env ADVERTISED_HOST=172.17.0.1 --env ADVERTISED_PORT=9092 spotify/kafka
Kafka Plugin#
The Kafka plugin provides access to Kafka brokers.
Configuration
You define the location of the Kafka conf file using the command line flag kafka-config, or by setting the KAFKA_CONFIG env variable.
For a list of Kafka configuration options, see Kafka conf file.
Status Check
The Kafka plugin uses the status check plugin to verify connection status.
Multiplexer#
The multiplexer instance provides access to Kafka brokers through connections. You can implement a connection supporting two messages type: byte, or proto.Message.
Both can create SyncPublishers and AsyncPublishers that implement the BytesPublisher or ProtoPubliser interfaces. The connections provide an API for consuming messages implementing the BytesMessage interface, or ProtoMessage interface.
    +-----------------+                                  +---------------+
    |                 |                                  |               |
    |  Kafka brokers  |        +--------------+     +----| SyncPublisher |
    |                 |        |              |     |    |               |
    +--------^--------+    +---| Connection   <-----+    +---------------+
             |             |   |              |
   +---------+----------+  |   +--------------+
   |  Multiplexer       |  |
   |                    <--+
   | SyncProducer       <--+   +--------------+
   | AsyncProducer      |  |   |              |
   | Consumer           |  |   | Connection   <-----+    +----------------+
   |                    |  +---|              |     |    |                |
   |                    |      +--------------+     +----| AsyncPublisher |
   +--------------------+                                |                |
                                                         +----------------+
Kafka plugin architecture
The Kafka plugin architecture figure shows the Kafka mux, connection and publishers.
Process Manager#
The process manager plugin enables the creation of processes to manage and monitor plugins.
References:
You obtain a process instance with the ProcessManager API using one of the following techniques:
- New process with options: Use the
NewProcess(<cmd>, <options>...)method. You need a command and set of optional parameters.
- New process from template: Use the
NewProcessFromTemplate(<tmp>)method. You need a parameter template. - Attach to existing process: Use the
AttachProcess(<pid>)method. You need a process id to attach to the existing process.
Management#
Note
The application is parent to all processes. Application termination causes all started processes to terminate. You can change this with the Detach option in process options.
Process management and process monitor methods are defined in the process.go file.
Process management methods:
You can manage the process state including start, stop, re-start and kill using the following process management methods:
Start()starts the plugin-defined process, stores the instance, and performs an initial status file read.Restart()attempts to gracefully stop, force stop if it fails, and then start or re-start the process.
Stop()stops the instance using a SIGTERM signal. Process is not guaranteed to stop. Note this method could result in un-detached child process termination.
StopAndWait()stops the instance using a SIGTERM signal, and waits until the process completes.Kill()force-stops the process using a SIGKILL signal, and releases all used resources.Wait()waits until the process completes.Signal()allows you to send a custom signal to a process. Note that some signals may cause unexpected behavior in process handling.
Process monitor methods:
You can monitor process run-time using the following process monitor methods:
IsAlive()returns true if process is running.GetNotificationChan()returns a channel for sending process status notifications. Use this method when you create a process via a template with thenotifyfield set to true. In other cases, you provide the channel.GetNamereturns the process name as defined in the status file.GetPid()returns process id.UpdateStatus()updates the plugin’s internal status and returns the actual status file.GetCommand()returns the original process command. Empty for attached processes.GetArguments()returns original arguments the process was started with. Empty for attached processes.GetStartTime()returns the time stamp when the process was started for the last time.GetUpTime()returns process up-time in nanoseconds.
Status Watcher#
The status watcher plugin looks for process status changes independent of the process creation method, and running state. The watcher uses the standard status labels includes running, sleeping, and idle. You can read state, including all reported changes, from a process status file.
The following lists several system-wide status types supported by the plugin:
- Initial applies only for newly created processes. You defined the process command but did not start it.
- Terminated if the process is not running, or does not respond.
- Unavailable if the process is running, but cannot obtain status.
The status watcher periodically polls process status, and can send notifications to you over the notification channel. If you created the process with a template, you can obtain the notification channel using the GetNotificationChan() channel.
Process Options#
Process option characteristics consist of the following:
- Available to all processes.
- Defined in API method or template.
- Optional.
The following lists the process options:
- Args: string array as a parameter, and the process will start with the given arguments.
- Restarts: count of automatic restarts following process state detected as terminated.
- Writer: define custom
stdOutandstdErrvalues. - Detach: no parameters applicable. Started process detaches from the parent application and given to the current user. This setting allows the process to run even after parent termination.
- EnvVar: define environment variables. For example, use
os.Environfor all. - Template: requires name
run-on-startupflag. This creates a template upon process creation. You must set the template path in the plugin. - Notify: provide a notification channel for status changes.
- autoTerm: automatically terminate “zombie” processes.
- cpu affinity: defines the cpu affinity for a given process.
Note
You could limit usability if you define a process with a template. Only standard os.stdout and os.stderr can be used.
Templates#
You define the process configuration for the process manager in a template file. You should store all templates in the path defined in the conf file.
./process-manager-plugin -process-manager-config=<path-to-file>You can craft a template “by hand” using a proto model, or generate one with the Template option when creating a new process.
Upon plugin initialization, all templates are read. Those with run-on-startup set to true in the template file are started. The process proto contains information you would set up in a template file.
The plugin API reads templates with GetTemplate(<name) or GetAllTmplates() methods. You can use the template object as a parameter to start a new process.
Supervisor#
The supervisor plugin provides mechanisms to manage processes and process hooks. The supervisor conf file contains a simplified process definition that allows you to specify multiple program instances. You can think of the supervisor as a process manager extension with an easier way to define and manage processes.
References:
Supervisor Conf File#
The supervisor conf file defines programs and hooks. You can define multiple programs and hooks in a single conf file.
The following describes the conf file definitions for a program:
- name: unique, but optional, program name. If omitted, the name is derived from the executable name.
- executable-path: required field containing a path to the program executable.
- executable-args: List of strings passed to the command as executable arguments.
- logfile-path defines the path to a log output file. If you do not define a logfile-path, the program log is written to stdout.
- restarts: defines the maximum auto-restarts of the given program. Note that program restarts cause termination hooks to execute, since the operating system sends events in order of: termination -> starting -> sleeping/idle.
- cpu-affinity-mask lets you bind a process to a given set of CPUs. Uses taskset to assign process to CPUs, and uses the same hexadecimal format. Invalid value prints the error message, but does not terminate the process.
- cpu-affinity-list: bind process to a given set of CPUs. Note that you can list CPUs as a list of CPU cores.
- cpu-affinity-setup-delay: postpones CPU affinity setup for a given time period. Some processes manipulate CPU scheduling during startup. This option lets you “bypass” that, and wait until the process loads before locking it to the given value.
Warning
Do not try to outsmart OS CPU scheduling! If a program has its own config file to manage CPUs, prioritize it. Incorrect use may slow down certain applications. Or an application may contain its own CPU manager which overrides any of your configured values. Locking process to CPU does NOT keep other processes off that CPU.
Hooks#
Hooks are commands or scripts that execute when a specific event related to the program occurs. The conf file defines as many hooks as needed. Hooks are not bound to any specific program instance or event. Instead, every hook is called for every program event. You configure the actions to perform, given a specific event, in the hooks definition.
Hooks define two fields:
- cmd: command called for the given hook.
- cmd-args command arguments.
The supervisor.conf file example found in the repo includes programs and hooks.
# Example supervisor config file starting vpp and agent,
# and defining hook for the vpp process which runs 'test.sh'
# if terminated
# See `taskset` man page to learn about how the cpu affinity
# mask should be set.
# ---
#
# programs:
#  - name: "vpp"
#    executable-path: "/usr/bin/vpp"
#    executable-args: ["-c", "/etc/vpp/base-startup.conf"]
#    logfile-path: "/tmp/supervisor.log"
#    restarts: 4
#    cpu-affinity-mask: 4
#    cpu-affinity-setup-delay: 1000000000
#  - name: "agent"
#    executable-path: "/usr/local/bin/vpp-agent"
#    executable-args: ["--config-dir=/tmp/config"]
#    logfile-path: "/tmp/supervisor.log"
#hooks:
#  - program-name: "vpp"
#    event-type: "terminated"
#    cmd: "/tmp/test.sh"
The following default environment variables are set before starting any hook:
- SUPERVISOR_PROCESS_NAME is set to the program name, and to start hooks bound to a specific process.
- SUPERVISOR_PROCESS_STATE is a label marking what happened with the process in a given event such as started, idle, sleeping, and terminated.
- SUPERVISOR_EVENT_TYPE defines event type.
All hooks start with all environment variables set.
Service Label#
The service label plugin provides other plugins with the ability to support microservice labels.
References:
Configuration
You can define the microservice label with one of the following options:
- Set the command line flag
microservice-label - Set the
MICROSERVICE_LABELenvironment variable. - Use the service label conf file
Example of retrieving and using the microservice label:
plugin.Label = servicelabel.GetAgentLabel()
dbw.Watch(dataChan, cfg.SomeConfigKeyPrefix(plugin.Label))